

Objectives
As a part of this Exercise, you should be able to do the following:
- Explore and verify the existing web application that needs to be migrated.
- Understand the steps involved in migrating a web application to AWS.
- Re-host the web/application server on Amazon Elastic Compute Cloud (Amazon EC2) using AWS Application Migration Service (MGN).
- Re-platform the database on Amazon Relational Database Service (Amazon RDS) using AWS Database Migration Service (AWS DMS).
- Test the migrated web application and verify it was migrated successfully.
Technical knowledge prerequisites
To successfully complete this lab, you should be familiar with the following services or features:
- Amazon EC2
- Amazon RDS
- AWS Identity and Access Management (IAM)
- Amazon Virtual Private Cloud (Amazon VPC)
Originally you have a 2-tier web application (a simple inventory application) hosted on 2 EC2 instances in an AWS region Oregon (us-west-2). This emulates a standard 2-tier web application hosted in your on-prem environment and is denoted as the SOURCE infrastructure that need to be migrated. Even though it uses EC2 instances to host the application, in reality, this could be physical or virtual servers running in your own environment. The 2-tier application has the following components:
- A Web/App server (SourceWebApp) running simple PHP and SQL application
- A database server (SourceDB) running MySQL
The following diagram shows the SOURCE infrastructure:
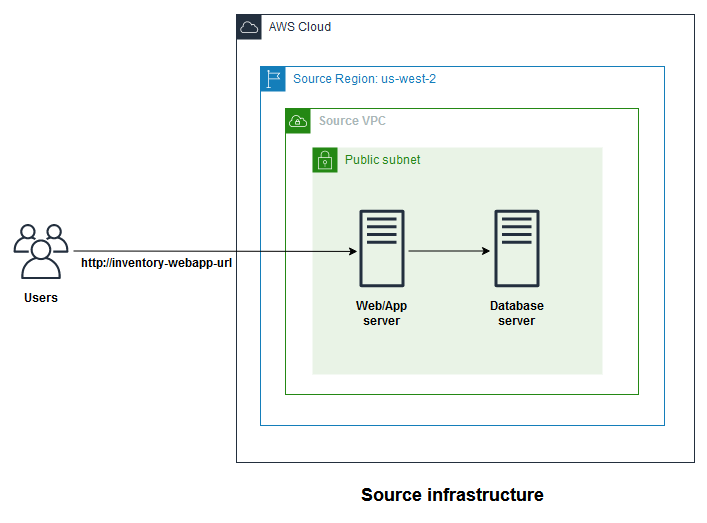
Image description: The preceding diagram depicts the source infrastructure where two servers make the web application. The first server is the Web/App server while the second represents the Database server. The Web Application server can be accessed by users via the designated URL. For the lab purpose, the source servers are hosted in a public subnet in a VPC named Source VPC. The source infrastructure is hosted in us-west-2 which represents the source region.
The lab has also a TARGET region N. Virginia (us-east-1) where you use it to migrate your source infrastructure to.
During the lab, you migrate each of the tiers to an AWS service:
- The web/application server is migrated to an EC2 server using AWS MGN
- The database server is migrated to an RDS DB instance using AWS DMS
The following diagram shows the target infrastructure after you complete the migration:
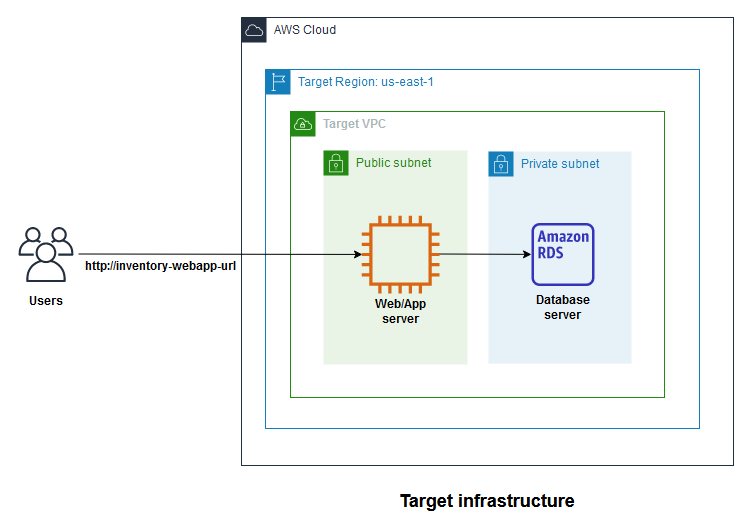
Image description: The preceding diagram depicts the target infrastructure which represents the end state of the lab after migration. The Web/App server is hosted on an EC2 instance while the Database server is hosted on an RDS database instance. Users can also access the web application via the designated URL.The target infrastructure is hosted in the us-east-1 region which represents the target region.
Note:
The main objective of this exercise is to walk you through the migration process and services. When you migrate your solutions to AWS, make sure you follow the best practice in terms of reliability and security pillars of the AWS Well-Architected best practice which you can find here.
Task 1: Explore and verify the source web application before migration
In this task, you browse the current source solution web application and identify the source servers to be migrated.
Task 1.1: Access the 2-tier web application
- To access the source web application, copy the SourceWebDNSName from the list to the left of these instructions and open it in a new browser tab. The Inventory System page is displayed with the following message “Table ‘inventory.inventory’ doesn’t exist”.
- At the top of the page, choose Settings , this displays the web/app configuration parameters for the source database server. Verify that the settings has the following values:
- Endpoint: This should be the value of the SourceDBPrivateName from the list to the left of these instructions.
- Database: inventory
- Username: DBUser
- Password: DBPassw0rd
- Choose Save.
The page displays the inventory which has three pre-created items. These items are stored in the database server and can be added, edited, deleted, and displayed using the web/app user interface.
Make some changes to the inventory so you can verify it after the migration.
- To create a new item in the inventory system, choose + Add Inventory in the Inventory page.
- In the Add Inventory page, enter the following details:
- Store: London
- Item: Amazon Show
- Quantity: 10
- Choose Submit.
The new item is added to the inventory system.
- Repeat the above step by adding another item with the following details:
- Store: Singapore
- Item: Amazon Ring
- Quantity: 8
Note: You can add, edit, and delete other items if you like to make more changes.
You have modified the existing inventory prior to the migration. Once the migration is completed, you can verify that your database have been migrated successfully.
Task 1.2: Identify the source servers to be migrated
- In the AWS Management Console, check the region name in the navigation bar and verify that you are in the SOURCE region (Oregon). If not, use the Region selector to choose the correct region.
- At the top of the AWS Management Console, in the search bar, search for and choose EC2.
- In the left navigation pane, in the Instances section, choose Instances.
- The Instances page is displayed and the two source servers of the web application (WebApp, and DB) are listed. These are the servers that you intend to migrate in the lab.
Throughout the lab steps, you need to navigate between different pages of the AWS Management Console in both the SOURCE region (Oregon) and the TARGET region (N. Virginia). To make this navigation simpler, it is recommended to open different browser tabs that represent the main pages you need during the lab.
- In the Instances console, in the SOURCE region (Oregon), choose the region selector at the top of the page and then choose US East (N. Virginia) in a new browser tab. For now, the page should not have any instances.
- At the top of the Instances console, in the TARGET region (N. Virginia), use the search bar to search for and choose AWS Application Migration Service in a new browser tab.
- At the top of the Instances console, in the TARGET region (N. Virginia), use the search bar to search for and choose Database Migration Service in a new browser tab.
You should have the following browser tabs open from the AWS Management Console:
- Instances console in the SOURCE region (Oregon)
- Instances console in the TARGET region (N. Virginia)
- AWS Application Migration Service console in the TARGET region (N. Virginia)
- Database Migration Service console in the TARGET region (N. Virginia)
It is recommended that you keep these four browser tabs open throughout the lab and navigate between them as directed by the lab instructions.
Task complete: You have tested and explored the source application before migration. Once the migration is completed. You can verify that your inventory system have been migrated successfully.
Task 2: Re-host the source application Server (SourceWebApp)
In this task, you use the Application Migration Service to initiate the migration of the SourceWebApp server.
Task 2.1: Configure the replication template settings
In order to migrate (re-host) the source application server to AWS, you use the Application Migration Service to facilitate the migration. This requires creating a Replication Server template. The template defines configuration of the server, that is responsible for receiving data sent by Application Migration Service agents and persisting the data on EBS volumes in your AWS account.
- From the browser tabs that you have opened, choose the AWS Application Migration Service tab in the TARGET region (N. Virginia).
- If this is the first time you visit the AWS Application Migration Service page then choose Get started.
- In the Set up Application Migration Service page, choose Set up service.
Note: If you get a “Failed to set up Application Migration Service. You must be an admin user of your AWS account in order to initialize the service” error banner at the top of the page, then you can ignore it and close the banner safely.
- At the upper-left corner of the Application Migration Service page, choose the menu icon to open the Application Migration Service navigation pane.
- In the left navigation pane, in the Settings section, choose Replication template.
- In the Replication template page, in the Replication server configuration, choose Edit.
- In the Edit replication template page, configure the following settings:
- For Staging area subnet, choose Target-Public-Subnet-1
- For Replication Server instance type, choose t3.small
- Leave all other settings as default and choose Save template.
A banner message is displayed at the top of the page indicating that the replication template is saved.
You have now configured the Replication Server template to be used in the migration staging.
Task 2.2: Initialize the migration of the source application server
Now you need to add the source application server to the Application Migration Service to start the migration. This is done by initiating the migration from your source application server shell.
- Connect to your source application server SourceWebApp instance by copying the SourceWebAppSSMURL from the list to the left of these instructions and open it in a new browser tab. The source application server terminal is opened with the SourceWebApp$ prompt.
Note: This emulates you connecting to your source server in your environment. Your server should have connectivity to AWS for the migration replication to start.
- Command: To download the replication installer, run the following commands:
sudo wget -O ./aws-replication-installer-init.py https://aws-application-migration-service-us-east-1.s3.amazonaws.com/latest/linux/aws-replication-installer-init.pyThe Application Migration Service installer is downloaded and saved.
- Command: To initiate the replication installer, run the following commands:
sudo python3 aws-replication-installer-init.pyThe installation of the AWS Replication Agent has started.
- Once you entered the above command, you are prompted to enter the TARGET region and IAM credentials to start the replication. Enter the following for each prompt:
- AWS Region Name: us-east-1 and press Enter
- AWS Access Key ID: Copy the AccessKeyID from the list to the left of these instructions, paste it at the prompt, and then press Enter
- AWS Secret Access Key: Copy the SecretKey from the list to the left of these instructions, paste it at the prompt, and then press Enter
Note: When pasting AWS Secret Access Key, its content is not displayed for security reasons. Just press Enter after pasting it.
Expected output:
******************************
**** This is OUTPUT ONLY. ****
******************************

Identifying volumes for replication.
Choose the disks you want to replicate. Your disks are: /dev/xvda,/dev/nvme0n1
To replicate some of the disks, type the path of the disks, separated with a comma (for example, /dev/sda,/dev/sdb). To replicate all disks, press Enter:- Press Enter at the prompt to replicate all disks of the source web/app server.
The replication starts. Wait for few minutes for the replication agent to be be downloaded, installed, and all volumes are identified. Once completed, you should see the following message on the terminal:
Expected output:
******************************
**** This is OUTPUT ONLY. ****
******************************

Identified volume for replication: /dev/nvme0n1 of size 8 GiB
All volumes for replication were successfully identified.
Downloading the AWS Replication Agent onto the source server... Finished.
Installing the AWS Replication Agent onto the source server... Finished.
Syncing the source server with the Application Migration Service Console... Finished.
The following is the source server ID: s-31661766ce4f3a857.
You now have 1 active source server out of a total quota of 20.
Learn more about increasing source servers limit at https://docs.aws.amazon.com/mgn/latest/ug/MGN-service-limits.html
The AWS Replication Agent was successfully installed.
You have now initiated the migration of the source application server.
Before closing the terminal session of the SourceWebApp server, you need to capture the TARGET RDS instance endpoint which was created as part of the lab build.
- Command: To capture the TARGET RDS instance endpoint, run the following command:
aws rds describe-db-instances --region us-east-1 --db-instance-identifier targetdb --query 'DBInstances[*].[Endpoint.Address]' --output textExpected output:
******************************
**** This is OUTPUT ONLY. ****
******************************

targetdb.cybxu2zwjbep.us-east-1.rds.amazonaws.com
Note: Your RDS endpoint name is most likely different from the above. It should still start with targetdb and ends with us-east-1.rds.amazonaws.com but it has different characters in between.
- Copy the RDS instance endpoint name you obtained from running the above command and paste it in your preferred note editor as you need to use it later to verify the migration.
- Close the AWS Systems Manager – Session Manager browser tab.
Task 2.3: Configuring the launch settings of the target server
- From the browser tabs that you have opened, choose the Application Migration Service in the TARGET region (N. Virginia).
- In the left navigation pane, choose Source servers.
- In the Source servers page, you should see the source application server that you initiated its replication.
The page should display the source server name, migration lifecycle, and the data replication status.
The migration lifecycle shows the different phases of the migration and you use it to monitor the progress of the migration through the lab steps.
At this point, the migration lifecycle should be Not ready. This is where the server is undergoing the Initial Sync process and is not yet ready for testing. Data replication can only commence once all of the Initial Sync steps have been completed.
While the source server is undergoing the initial sync process, you need to configure the Launch Settings where you define the specifications of the TARGET instance to be launched once the replication is completed and the server is ready for testing.
- In the Source servers page, choose the source-server-name link to access the its details. This would be something like ip-10-0-0-176.us-west-2.compute.internal.
- In your source server page, choose the Launch settings tab.
- In the General launch settings section, choose Edit.
- For the Instance type right sizing settings, choose Off.
- Scroll down and choose Save settings.
A banner message is displayed at the top of the page indicating that the launch settings has been changed.
- While still on the Launch setting tab, scroll down to the EC2 Launch Template. These settings defines the specifications and settings of the TARGET instance to be launched. To modify these settings according to the lab scenario, choose Modify.
- In the About modifying EC2 Launch Templates pop-up window, choose Modify, a new Modify template (Create new version) page is opened. This is the EC2 instance launch template that is used to launch the test instance for migration.
- In the Modify template (Create new version) page, in the Instance type section, for the Instance type drop-down menu, choose t3.small.
- Scroll down to the Network settings section and configure the following:
- Subnet: Choose Target-Public-Subnet-1
- Firewall (security group): Choose Select existing security group
- Common security groups: Choose the security group which has EC2SecurityGroup in its name
- Expand the Advanced network configuration and for Auto-assign public IP, choose Enable
- Scroll down to the Resource tags section and expand it.
- Locate the Name tag and change its value to TargetWebApp.
- Scroll down to the Advanced details section and expand it.
- Under the IAM instance profile, choose Target-WebApp-Instance-Profile.
- Scroll down to the User data section.
- In the User data section, paste the following script:
#!/bin/bash
RDS=$(aws rds describe-db-instances --region $(curl -s http://169.254.169.254/latest/meta-data/placement/region) --db-instance-identifier targetdb --query 'DBInstances[*].[Endpoint.Address]' --output text) && echo $RDS
sed -i "1,/^$ep/s/'[^']*'/'$RDS'/" /var/www/html/get-parameters.php
Note: The above script runs when the test instance is launched first time and ensures that your migrated application server is pointing to the migrated RDS instance which was built as part of the lab build.
- Choose Create template version.
A banner message is displayed at the top of the page indicating that the launch template is successfully modified and a new version has been created.
Now you need to set the new created version as the default version so it can be used by the Application Migration Service for your source application server.
- Scroll down in the Modify template (Create new version) page which is displayed to you and choose View launch templates.
- In the Launch templates page select the radio button beside the existing Launch template ID, then in the Actions drop-down menu choose Set default version.
- In the Set default version pop-up window, choose the highest number in the Template version drop-down menu.
- Choose Set as default version.
A banner message is displayed at the top of the page indicating that the default version of launch template was successfully updated to a new version.
You should also note that the existing launch template has a similar number under the Default version and Latest version columns.
You have now configured the EC2 launch template to be used to launch instances for the migration of the source application server.
- Close the Launch templates browser tab as you do not need it anymore.
Now check the status of replication of the source application server.
- From the browser tabs that you have opened, choose the Application Migration Service in the TARGET region (N. Virginia).
- In the left navigation pane, choose Source servers.
- In the Source servers page, choose your source server name link to access the its details.
- In your source server name page, choose the Migration dashboard tab. You can view the progress of the replication under the Data replication status section.
You can also view the migration lifecycle under the Lifecycle section. At this point, the lifecycle state should still be Not ready. Once the replication is completed, the lifecycle state changes to Ready for testing.
This replication phase might take about 15-20 minutes. While waiting for this to be completed, check the Application Migration Service Lifecycle to learn more about the different states of the migration lifecycle, .
Note: While waiting for this state to be completed, you can check the Instances page in the TARGET region (N. Virginia) from the browser tabs that you have opened. You should see a new instance named AWS Application Migration Service Replication Server. This instance is launched by the Application Migration Service and is communicating with the source application server to replicate its disks. You may need to choose refresh at the top of the page to refresh the list of instances.
- From the browser tabs that you have opened, go back to the AWS Application Migration Service tab in the TARGET region (N. Virginia) where you are monitoring the migration lifecycle under the Migration dashboard tab.
- Wait till the migration dashboard indicates the following:
- In the Lifecycle section, the lifecycle state is changed to Ready for testing
- In the Data replication status section, the overall status is Healthy and the Replication progress shows Initial replication finished
Once this phase is completed, you can move to the next phase of the migration.
Task 2.4: Launch the test instance
The next phase of the migration is to launch a test instance. This instance is launched based on the launch template that you configured in the previous task and uses the replicated disks from the source application server.
- From the browser tabs that you have opened, choose the AWS Application Migration Service tab in the TARGET region (N. Virginia).
- In your source server name page under the Application Migration Service page, choose the Test and cutover drop-down menu and choose Launch test instances.
- In the Launch test instance for 1 server pop-up window, choose Launch.
A banner message is displayed at the top of the page indicating starting to launch test instance for 1 server.
- In the Migration dashboard tab, the lifecycle state is now changed to Test in progress.
While waiting for this state to be completed, check the EC2 instances in the TARGET region.
- From the browser tabs that you have opened, go to the Instances page in the TARGET region (N. Virginia).
Under the Instances, you should see another instance named AWS Application Migration Service Conversion Server. This instance is launched by the Application Migration Service and it converts the disks to boot and run on AWS. It is only be available for a short time and then it is terminated.
Note: You may need to choose refresh at the top of the page to refresh the list of instances.
After a while, under the Instances, you should see another instance which is launched and it has a TargetWebApp name. This instance might be stopped and then started again.
- Go back to the Application Migration Service page where you are monitoring the lifecycle state of the migration. Wait until the lifecycle indicates the following:
- Lifecycle is changed to Test in progress
- Launch status: Launched
- First boot: Succeeded
Note: This phase might take about 10-15 minutes to complete.
- From the browser tabs that you have opened, go to the Instances page in the TARGET region (N. Virginia). You can view the new migrated instance. You may need to choose refresh at the top of the page to refresh the list of instances. The instance has a TargetWebApp name. It was launched based on the launch template that you configured earlier. You also notice that the AWS Application Migration Service Conversion Server is terminated as it is not required after the test instance is launched.
In real migration, you normally spend good time logging to the launched test instance and run different tests to validate the migration. However, for the purpose of this lab, you perform a simple test to verify that the test instance is ready to go to the next phase.
- In the Instances page in the TARGET region (N. Virginia), select the check box beside the TargetWebApp instance.
- Under the instance Details tab, locate the Public IPv4 DNS name of the instance, copy it, and open it in a new browser tab. The Inventory page is displayed with the following message “Unknown database ‘inventory’”. This is because the database is not yet migrated.
- Choose Settings at the top of the page, this displays the web/app configuration parameters for the source database server. Verify that the Endpoint field is populated with the RDS instance endpoint name that you captured in your preferred note editor earlier. If so, then the Web/App server is migrated successfully and the database endpoint was updated in the migration to point to the new RDS. This was done as part of the user data script that you configured in the launch template.
For the purpose of this lab, this test would be sufficient to proceed to the next phase.
- Close the Inventory browser tab.
- Go back to the Application Migration Service page and choose the Test and cutover drop-down menu and then choose Mark as “Ready for cutover”.
- In the Mark 1 server as “Ready for cutover“ pop-up window, choose Continue.
A banner message is displayed at the top of the screen indicating that the server marked as ready for cutover.
You have indicated that this server has been tested and is now ready for a Cutover instance to be launched.
- Go back to the Instances page in the TARGET region (N. Virginia) and choose refresh at the top of the page to refresh the list of instances.
- You notice that the TargetWebApp test instance changes its status to Shutting-down and then Terminated after couple of minutes.
Note: While testing your server in the testing phase, if you find any issues which indicate that the server was not migrated successfully or that you have misconfigured any settings, you can simply revert back to the previous phase by choosing Revert to “Ready for testing” in the Test and cutover drop-down menu. You can then modify the launch template settings and repeat the process.
Task 2.5: Launch cutover instance
Now that your server is marked as ready for cutover, you need to initiate the cutover.
- In the Application Migration Service page where you are monitoring the lifecycle state of the migration, choose the Test and cutover drop-down menu and then choose Launch cutover instances.
- In the Launch cutover instance for 1 server pop-up window, choose Launch.
A banner message is displayed at the top of the screen indicating that it is starting to launch cutover instance.
Note: If you received an error banner message of “Failed to launch cutover instances”, then you need to wait for couple of minutes and then retry. This means that AWS MGN is still busy in backend process.
The lifecycle state is now changed to Cutover in progress.
- Go to the Instances page in the TARGET region (N. Virginia).
You notice that the test instance which was launched in the previous phase is now terminated and a new instance launches which is your final target instance.
Note: You may need to choose refresh at the top of the page to refresh the list of instances.
This might take another 10-15 minutes. While waiting for this phase to be completed, you can proceed to the next task and migrate the database server. Then you can verify the cutover in the last task.
Task complete: You have initiated the cutover phase for migrating your source application server to AWS.
Task 3: Re-platform the database server
In this task, you migrate the source database which is currently running on an EC2 instance in the SOURCE region (emulating a database server running in your environment) to Amazon Amazon RDS using AWS DMS in the TARGET region.
Note: You can also migrate your database server to an EC2 instance in AWS in a similar approach to the one you used in the previous task where you use the Application Migration Service. This would be a standard lift-and-shift migration. However, in this lab, you use the AWS DMS to re-platform the database to an RDS instance.
The TARGET region (N. Virginia) has already had an RDS instance running. This instance was deployed as part of the lab build and currently it sits in the same subnet as the migrated application server which you completed in the previous task.
You recall that you configured EC2 user data in your web/application migration launch template. The user data script was retrieving the RDS instance endpoint name and configuring it as the target database for the web/application. So your migrated web/application server is already configured to point to the RDS instance. However, you still need to migrate the database using AWS DMS.
To complete this task, you need to create a source endpoint, target endpoint, and a database migration task to initiate the migration.
Task 3.1: Configure source and destination endpoints
- At the top of the AWS Management Console, in the search bar, search for and choose Database Migration Service.
- In the left navigation pane, in the Migrate data section, choose Endpoints.
- In the Endpoints page, choose Create endpoint.
- In the Create endpoint page, under the Endpoint type section, choose Source endpoint.
- Under the Endpoint configuration section, configure the following:
- For the Endpoint identifier, enter mysql-source
- For the Source engine, choose MySQL
- For Access to endpoint database, choose Provide access information manually
- For Server name, enter the SourceDBPublicName which you can find in the list to the left of these instructions.
- For Port, enter 3306
- For Username, enter DBUser
- For Password, enter DBPassw0rd
- For Secure Socket Layer (SSL) mode, choose none
- Choose Create endpoint.
A banner message is displayed at the top of the page indicating that the source endpoint is created successfully.
The newly created endpoint is displayed under the Endpoints page. This endpoint is pointing to your source database server in the SOURCE region.
- Select the check box beside the mysql-source endpoint, then in the Actions drop-down menu, choose Test connection.
- In the Test endpoint connection page, choose Run test.
The AWS DMS runs a test connection to the source endpoint.
- Wait for the test status to change to successful, then choose Back.
Note: If the status of the test is not successful, then check your endpoint configuration and repeat the test.
Now create the Target endpoint.
- In the Endpoints page, choose Create endpoint.
- In the Create endpoint page, under the Endpoint type section, choose Target endpoint and select the Select RDS DB instance check box . For the RDS Instance drop-down menu, choose targetdb.
- Under the Endpoint configuration section, configure the following:
- For the Endpoint identifier, this should be populated automatically with targetdb
- For the Target engine, choose MySQL
- For Access to endpoint database, choose Provide access information manually
- For Server name, this should be populated automatically with RDS instance endpoint name
- For Port, enter 3306
- For Username, enter DBUser
- For Password, enter DBPassw0rd
- For Secure Socket Layer (SSL) mode, choose none
- Choose Create endpoint.
A banner message is displayed at the top of the page indicating that the targetdb created successfully.
The newly created endpoint is displayed under the Endpoints page. This endpoint is pointing to your target RDS instance in the TARGET region.
- Select the check box beside the targetdb endpoint, then in the Actions drop-down menu, choose Test connection.
- In the Test endpoint connection page, choose Run test.
The AWS DMS runs a test connection to the target endpoint.
- Wait for the test status to change to successful, then choose Back.
Note: If the status of the test is not successful, then check your endpoint configuration and repeat the test.
You have now configured both source and target endpoints which AWS DMS migration task uses to migrate your perform the database migration. You also verified that both endpoints can be successfully reached by the replication instance.
Task 3.2: Configure a database migration task
Now configure the database migration task.
- In the AWS Database Migration Service page, in the left navigation pane, in the Migrate data section, choose Database migration tasks.
- In the Database migration tasks page, choose Create task.
- In the Create database migration task page, configure following under the Task configuration:
- For Task identifier, enter MySQLMigrationTask
- For Replication instance, choose migration-replication-instance – vpc-id
- For the Source database endpoint, choose mysql-source
- For the Target database endpoint, choose targetdb
- For the Migration type, choose Migrate existing data
- Scroll down to the Table mappings section.
- In the Table mappings section, for the Editing mode, choose Wizard.
- Expand the Selection rules then choose Add new selection rule.
- Configure the following for settings for the selection rule:
- For Schema, choose Enter a schema
- For the Source name, enter inventory
- For the Source table name, enter %
- For the Action, choose Include
- In the Premigration assessment section, uncheck Turn on premigration assessment.
- Scroll down and choose Create task.
A banner message is displayed at the top of the page indicating that the migration task creation in progress and the task appears and the Database migration tasks. Once the task is created, another banner message is displayed at the top of the page indicating that the task is created successfully.
Once the task is created, the database migration starts and you can check the status of the task under the Status column beside the task identifier.
- Choose the mysqlmigrationtask link to access the task details.
- In the mysqlmigrationtask page, you can see the status of migration under the Summary section. Wait until the status indicates Load complete.
- Choose the Table statistics tab and under the Table statistics section, you can see the tables that are migrated.
- Scroll to the right and note the total number of rows in the inventory table, this should be equal to the number of rows in your inventory system including the rows you created in task 1.
Task complete: You have successfully completed the migration of your source database server to AWS where it is now running on and RDS instance.
Task 4: Test the migrated application
After you migrated initiated the cutover of the SourceWebApp and completed the migration of the source database, you need to verify that the cutover is completed and test the application.
- Go back to the Application Migration Service page where you are monitoring the lifecycle state of the migration. Wait until the lifecycle indicates the following:
- Next actions: Finalize cutover
- Lifecycle is changed to Cutover in progress
- Launch status: Launched
- First boot: Succeeded
Now you can complete the cutover.
- In the Application Migration Service page, choose the Test and cutover drop-down menu and then choose Finalize cutover.
- In the Launch cutover instance for 1 server pop-up window, choose Finalize.
A banner message is displayed at the top of the screen to indicating that cutover is finalized.
You can view now your migrated instance in your TARGET region (N. Virginia).
- In the browser tabs that you have opened, choose the Instances page in the TARGET region (N. Virginia).
- Under Instances, select the check box beside the TargetWebApp instance which should be in Running state.
- Under the instance Details tab, locate the Public IPv4 DNS name of the instance, copy it, and open it in a new browser tab.
- The page should display an identical inventory to the one you tested at the beginning of your lab including the items you added and edited.
The final step would be marking the server as archived to complete the migration process.
- In the Application Migration Service page, choose the Actions drop-down menu and then choose Mark as archived.
- In the Archive 1 server“ pop-up window, choose Archive.
A banner message is displayed at the top of the page indicating that the server is archived.
Task complete: You have successfully tested the migration of your inventory web application.
Conclusion
You have now successfully done the following:
- Explored and verify the existing web application that need to be migrated
- Migrated the application server to an Amazon Elastic Compute Cloud (Amazon EC2) using Application Migration Service (MGN)
- Migrated the database to an Amazon Relational Database Service (Amazon RDS) using AWS Database Migration Service (AWS DMS)
- Migrated the static website contents to an S3 bucket
- Tested the migrated web application and verified it was migrated successfully
Global First Institute bringing the world's Top Industry Expert Mentors on the table and help the community to grow and shine.
0 Comments